This is an accessory to go with one of my toy.
Tuesday, 29 December 2009
Monday, 14 December 2009
Battle Sister Realized
For those who's been wondering what I've been doing props & costumes wise since the last update, THIS is what I've been working on for the last 3 to 6 months...
I had no prior experience in armored costume making, or any kind of training in this field. All I had was an enthusiasm to learn, and to observe how others make stuff.
Before I get down to the nitty-gritty of what the costume is made of, here are some beauty shots. Thanks so much to Radzie(http://ziedesign.com/blog/) of Sri Gaya Studio for taking these photos for a song.


Torso armor (including shoulder guards) is made entirely of plumbing pipe, shaped with a heat gun; Chest cups were fashioned out of plastic bowls; Collar is cut from a bucket; relief details on shoulder guard and chest cup, and the purity seals were sculpted out of paper clay. the skull on the 'I' was made out of paper clay, then casts in resin using a silicon mold.

Vembraces & Grenades were made from plumbing pipe as well. Finger gauntlets were fashioned out of Wonderflex , which is self-adhesive while its still hot. The skull on the cross was made out of paper clay, then casts in resin using a silicon mold.
Corset is purchased, and beads sewn on by our female costumer.

The base for the leg armor are the only fibreglass pieces in this costume, They were purchased, and started out as Clone Trooper leg armor. I had to modify them extensively to make them fit our female costumer. The base for the knee guards are made of plumbing pipe, and the relief details sculpted out of paper clay. Armor plating on the shoe is made of Wonderflex.
She is seen holder a couple of grenades which I made for fun while waiting for epoxy and putty to dry. They're sized to fit into the magazine chamber and fired like regular rounds.


Close up of the knee guards.

The squarish part of the backpack is made of corrugated cardboard, then covered with mounting board. The rounded section on top is a combination of plumbing pipe, MDF board, perspex sheet, and couple of plastic bowls. The spikes are cast resin.

Close up of the backpack and shoulder guard.
The hose is leftover from a TIE Fighter Pilot helmet I purchased sometime ago.

Backpack detail & close up of purity seal.

The Bolter is constructed almost entirely out of foam board. The handle is made of MDF board, and extends all the way up to the top and out to the front in an 'L' shape to give the whole thing a 'spine' to rest on. The muzzle is a plumbing pipe.

The creators
Joanna (costumer): All soft parts and sculpted details
Daniel (on left): Bolter base structure
Myself: Everything else except the finger gauntlets (hand guard), wich were made by Edgar
Special thanks to:
Shariff for helping with the backpack, and looking for the chain.
Julian for financial support & constant encouragement
and all others who provided support in one way or another, whether physically or in spirit.
I had no prior experience in armored costume making, or any kind of training in this field. All I had was an enthusiasm to learn, and to observe how others make stuff.
Before I get down to the nitty-gritty of what the costume is made of, here are some beauty shots. Thanks so much to Radzie(http://ziedesign.com/blog/) of Sri Gaya Studio for taking these photos for a song.


Torso armor (including shoulder guards) is made entirely of plumbing pipe, shaped with a heat gun; Chest cups were fashioned out of plastic bowls; Collar is cut from a bucket; relief details on shoulder guard and chest cup, and the purity seals were sculpted out of paper clay. the skull on the 'I' was made out of paper clay, then casts in resin using a silicon mold.

Vembraces & Grenades were made from plumbing pipe as well. Finger gauntlets were fashioned out of Wonderflex , which is self-adhesive while its still hot. The skull on the cross was made out of paper clay, then casts in resin using a silicon mold.
Corset is purchased, and beads sewn on by our female costumer.

The base for the leg armor are the only fibreglass pieces in this costume, They were purchased, and started out as Clone Trooper leg armor. I had to modify them extensively to make them fit our female costumer. The base for the knee guards are made of plumbing pipe, and the relief details sculpted out of paper clay. Armor plating on the shoe is made of Wonderflex.
She is seen holder a couple of grenades which I made for fun while waiting for epoxy and putty to dry. They're sized to fit into the magazine chamber and fired like regular rounds.


Close up of the knee guards.

The squarish part of the backpack is made of corrugated cardboard, then covered with mounting board. The rounded section on top is a combination of plumbing pipe, MDF board, perspex sheet, and couple of plastic bowls. The spikes are cast resin.

Close up of the backpack and shoulder guard.
The hose is leftover from a TIE Fighter Pilot helmet I purchased sometime ago.

Backpack detail & close up of purity seal.

The Bolter is constructed almost entirely out of foam board. The handle is made of MDF board, and extends all the way up to the top and out to the front in an 'L' shape to give the whole thing a 'spine' to rest on. The muzzle is a plumbing pipe.

The creators
Joanna (costumer): All soft parts and sculpted details
Daniel (on left): Bolter base structure
Myself: Everything else except the finger gauntlets (hand guard), wich were made by Edgar
Special thanks to:
Shariff for helping with the backpack, and looking for the chain.
Julian for financial support & constant encouragement
and all others who provided support in one way or another, whether physically or in spirit.
Saturday, 14 March 2009
LEDs for Luke ROTJ Hero Saber Control Box
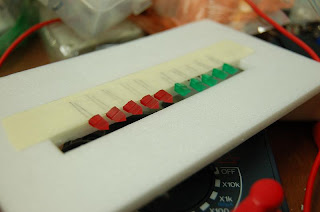
After years of patient searching (and waiting), a source for the red and green triangular LEDs needed for my Rylo Luke ROTJ Hero Saber Control Box was finally found by CFC.
I managed to use the Jedi Mind Trick on CFC and had him sent five sets to me. And here they are in all their unbridled glory:

The triangular LEDs CFC found that are very close to those on the screen used Luke ROTJ Hero Control box; however what he found are Isosceles Triangles, instead of the screen accurate Equilateral Triangles.
So I files them down to the correct shape. A diamond file made quick work of them, and I was done in less then half an hour.
And here they are after I've modified four of the pairs:
Can't see the difference? That's because they're really puny, with each side of the triangle only around 3mm long.
Here are some close-up pics.


The original LED is on the left, while the filed down LED is on the right.
The filed edges look a bit uneven, but that's because of the extreme magnification. Remember, each side of the triangle is only about 3mm long, so you really can't see the flaws with the naked eye. I was tempted to go back and file them a bit more after seeing the pics, but I have to fight the temptation because I may just file away too much.
Now I need to pack them and mail them to a friend who will make the holes in my control box and install them for me.
I initially wanted to make the holes and fit them myself, but due to the small size, I've decided to leave this to the professionals.
Will update when I get my control box back.
I managed to use the Jedi Mind Trick on CFC and had him sent five sets to me. And here they are in all their unbridled glory:

The triangular LEDs CFC found that are very close to those on the screen used Luke ROTJ Hero Control box; however what he found are Isosceles Triangles, instead of the screen accurate Equilateral Triangles.
(Photo courtesy of Star Wars MoM Exhibition)
So I files them down to the correct shape. A diamond file made quick work of them, and I was done in less then half an hour.
And here they are after I've modified four of the pairs:
Can't see the difference? That's because they're really puny, with each side of the triangle only around 3mm long.
Here are some close-up pics.


The original LED is on the left, while the filed down LED is on the right.
The filed edges look a bit uneven, but that's because of the extreme magnification. Remember, each side of the triangle is only about 3mm long, so you really can't see the flaws with the naked eye. I was tempted to go back and file them a bit more after seeing the pics, but I have to fight the temptation because I may just file away too much.
Now I need to pack them and mail them to a friend who will make the holes in my control box and install them for me.
I initially wanted to make the holes and fit them myself, but due to the small size, I've decided to leave this to the professionals.
Will update when I get my control box back.
Monday, 23 February 2009
TIE Pilot Costume - The End Is In Sight
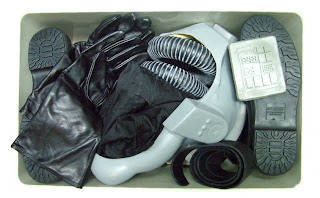
Living in a box: I have the Helmet (need painting), Flight Suit, Boots, Gauntlet Gloves, Commpad (need painting), Belt, Buckle (not pictured), Ribbed Hose, and the Chest Box (not pictured).
I've accumulated 90% of the parts for my TIE Fighter Pilot costume for sometime now, and the only piece that still eludes me remains the Torso & Back armour. I missed out on getting a set a few times over the years due partly to procrastination, prices I was not willing to pay, and various other circumstances not under my control.
last week, I decided to make a concerted effort to get this costume done once and for all, so I again contacted a fellow Malaysian who now resides in the USA, who is an ardent Star Wars fan, and an authority on TIE Fighter Pilot costume. I've been in contact with him before, but due to both our hectic schedules, we failed to come to an agreement on a timely manner, and the deal fell through.
This time he responded promptly, and have what I needed at hand, at a price I can live with. So looks like a set of Torso & Back armour complete with shoulder straps will be heading my way soon.
Subscribe to:
Posts (Atom)


