Monday 28 January 2013

Added Another Gem To My Collection Today...

Haven't bought any prop or prop parts for years; in fact I've been selling off stuff from my collection to thin it down. However, I simply couldn't resist when I saw this M38 scope being put up for sale by another collector.


 This is my second M38 scope; I acquired my first many years ago. Here they are side by side.


And here's a pic of all my real scopes. The shorter one on an elevated base is an M19 scope.


Friday 20 January 2012

Took It Easy In 2011...

Didn't make any grand costume in 2011, but instead devoted almost the entire year to improving my fitness. Just didn't have the motivation to stress myself with deadlines with my father's illness, and eventual death.

I only made an Eviscerator, the knee guard, and boot covers for Jna's Sister Repentia costume.

 
 Jna as Sister Repentia at HobbyCon 2011
(goto jna's Devianart page for more images)

 Detail views of the Eviscerator
(Battle damage & blood splatter effect courtesy of Oliver Voo)

 And a Power Fist for an out-of-town client.


Friday 11 March 2011

My Preciousssssssssssss....

Soon... 


Customized Vintage 1887 Winchester Shotgun (T2)


Glock 17 (aka Jason Bourne's gun)
with tactical light and laser sight (optional)


Baretta M9 (Stargate Atlantis sidearm)

Monday 13 December 2010

Saint Celestine- The Living Saint

The Saint Celestine project was conceived and implemented hot on the heels of my SoB build last year.

Primary reference was from this illustration found on the official Witch Hunter codex.


Other references were glimpsed from online images of painted mini figures and various fan arts.


After keeping the project under wraps for almost an entire year, the finished product was finally revealed at HobbyCon 2010, held in CityMall, Kota Kinabalu, Sabah.

 
With the rest of the team
(photo credit: David Shia)

Yus, our Dark Angel, won 1st place in the solo cosplay competition.
(Photo credit: Colvin Teo)

The team won 1st place in the group cosplay competition.

And here are some pics from an outdoor photoshoot done a week before HobbyCon 2010:


Detail view of the costume parts:

 
Halo, Pauldrons, Collar & Breastplate

Back view.
The strips between the wings are parchment inscribed with declarations and prayers.
Purity seals can be seen on the skirt.

 
Right Pauldron with illuminated red ruby

Finger Gauntlet and Ardent Sword

Purity seal, Cuisse, Greave & Poleyn

 
Cuisse, Greave & Poleyn

 Sabaton & Shackle

Construction credits:
  • Halo spikes base structure: Richard Nelson Sokial
  • Finger Gauntlet & Ardent Blade base structure: Neo Nova Craft Production
  • All raised details (except wings on Poleyn), cloth parts, purity seals, parchment, flower for Ardent Blade & weathering: Joanna

Here are some WIP pics to provide some insight on how certain parts were constructed:

 Collar and shoulder support structure

Beginning of the Vembraces

Cuisse with unpainted Fluer De Lise

Front & back parts of the Greaves

And for those who are wondering how much the wings costs, here's an example of what others charge for something close to what I've made:
Huge Feather Wings from dragonwings.net


Updates:

Saturday 29 May 2010

The HIC

Decided to take a break from the other prop builds (all of which are urgent) and finally tackle the beast that is the 'HIC'.

Although this is an extremely large project, it is relatively simple work wise, compared to some of the other much smaller projects I'm working on right now.


I've had the front panel (cut up in 5 sections for ease of shipping) for a few years now, but have kept them in storage all this time.


The first task is to assemble and secure the 5 panels onto a
½ inch thick plywood so that I can finally stand it up to save on storage space, and to make working on it easier.

Took me over two weeks to get to this stage, not because it is difficult, but because I simply couldn't decide on what to use to secure it to the plywood. Contact adhesive is out, since it lacks the tensile strength, and would deteriorate with time, AND could come undone if moisture should get to it. I thought about using epoxy, but a structure this size would require a LOT of epoxy, and mixing that much of two-part epoxy is not really I look forward to doing.


And then it hit me; I have 4 litres of resin sitting right here, and resin is like the stickiest and strongest stuff you can get. PLUS the panels are made from a kind of flexible resin, so it should work beautifully.


And voila, the panels went on firm and secure!


(angle grinder is there for scale to show that this ain't no miniature :P)

While the resin cures, I heated areas where the panels come together to make them pliable so I can level and line the edges up as perfectly as possible. This way I'll have less work later sealing the seams to make one panel flow smoothly into the other.

The next challenge is to get my thick-headed carpenter to make the box exactly to specs =_='''

Sunday 2 May 2010

SoB Backpack Upgrade

Finally manged to install the LED strip with custom circuit board made by my friend Chow.


And here is the end result.


With that, the backpack is now officially 'activated'.

Tuesday 6 April 2010

Tuesday 29 December 2009

Latest Prop Accessory

This is an accessory to go with one of my toy.

Yes even my toys have toys Photobucket


If you don't know what it is, don't ask.

if you know what it is, keep it to yourself Photobucket

Monday 14 December 2009

Battle Sister Realized

For those who's been wondering what I've been doing props & costumes wise since the last update, THIS is what I've been working on for the last 3 to 6 months...

I had no prior experience in armored costume making, or any kind of training in this field. All I had was an enthusiasm to learn, and to observe how others make stuff.

Before I get down to the nitty-gritty of what the costume is made of, here are some beauty shots. Thanks so much to Radzie(http://ziedesign.com/blog/) of Sri Gaya Studio for taking these photos for a song.


Torso armor (including shoulder guards) is made entirely of plumbing pipe, shaped with a heat gun; Chest cups were fashioned out of plastic bowls; Collar is cut from a bucket; relief details on shoulder guard and chest cup, and the purity seals were sculpted out of paper clay. the skull on the 'I' was made out of paper clay, then casts in resin using a silicon mold.


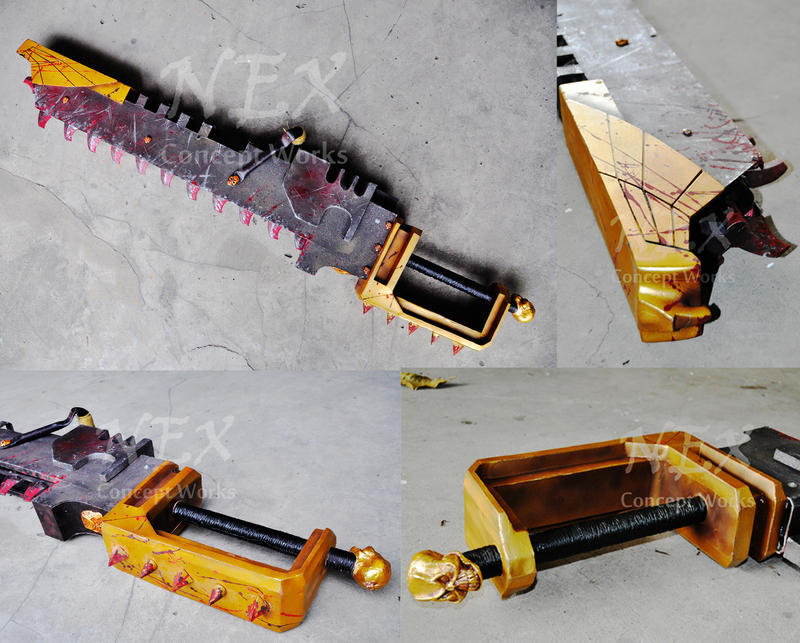
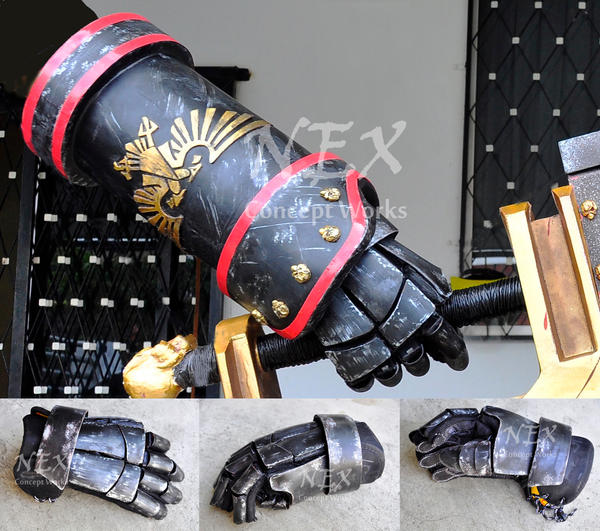
Vembraces & Grenades were made from plumbing pipe as well. Finger gauntlets were fashioned out of Wonderflex , which is self-adhesive while its still hot. The skull on the cross was made out of paper clay, then casts in resin using a silicon mold.

Corset is purchased, and beads sewn on by our female costumer.


The base for the leg armor are the only fibreglass pieces in this costume, They were purchased, and started out as Clone Trooper leg armor. I had to modify them extensively to make them fit our female costumer. The base for the knee guards are made of plumbing pipe, and the relief details sculpted out of paper clay. Armor plating on the shoe is made of Wonderflex.


She is seen holder a couple of grenades which I made for fun while waiting for epoxy and putty to dry. They're sized to fit into the magazine chamber and fired like regular rounds.


Close up of the knee guards.


The squarish part of the backpack is made of corrugated cardboard, then covered with mounting board. The rounded section on top is a combination of plumbing pipe, MDF board, perspex sheet, and couple of plastic bowls. The spikes are cast resin.


Close up of the backpack and shoulder guard.
The hose is leftover from a TIE Fighter Pilot helmet I purchased sometime ago.


Backpack detail & close up of purity seal.


The Bolter is constructed almost entirely out of foam board. The handle is made of MDF board, and extends all the way up to the top and out to the front in an 'L' shape to give the whole thing a 'spine' to rest on. The muzzle is a plumbing pipe.


The creators
Joanna (costumer): All soft parts and sculpted details
Daniel (on left): Bolter base structure
Myself: Everything else except the finger gauntlets (hand guard), wich were made by Edgar

Special thanks to:
Shariff for helping with the backpack, and looking for the chain.
Julian for financial support & constant encouragement
and all others who provided support in one way or another, whether physically or in spirit.